Virtual Router Manager
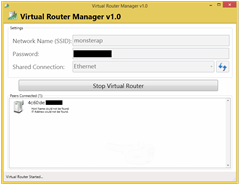
 In an earlier article, I had written about how to allow your EV3 to connect to your laptop (or desktop) with a shared WiFi network, using a feature called Hosted Network. It essentially turns your computer into an Access Point (AP). Since then I’ve had a bit more experience with it and I’ve found a very easy to use program called Virtual Router Manager (VRM) to do all of the hard work.
Things to note
Hosted Network is really great but there are some drawbacks:
- In my experience, it is more stable when using a wired connection for your home network and WiFi just for the Hosted Network stuff. If you cannot use a wired network to connect to your home LAN, consider getting a second WiFi dongle for the Hosted Network AP. They’re super cheap and will save you a lot of hassle.
- VRM cannot always retrieve the IP address given to the EV3. It’s easy to find, though, see below.
- It doesn’t seem to play nice with my HTC One (or my other mobile devices). This may be due to the fact that they will frequently turn their WiFi on and off to save power and then reconnect as necessary.
VRM does not solve these problems but makes it easy to restart the process if required.
Finding the IP address assigned to your EV3
After the EV3 has connected to VRM, its MAC address will appear in the “Peers Connected” pane. If you don’t have a lot of network devices on your system, you can simply type “arp -a” in the command prompt. If you have something like VirtualBox or VMware Workstation installed, you may find the number of devices, (virtual) network interfaces and ARP table entries a little overwhelming.
c:\>arp -a

Interface: 192.168.178.33 --- 0x4
  Internet Address      Physical Address      Type
  192.168.178.1         YY-YY-YY-XX-XX-XX     dynamic
  192.168.178.22        YY-YY-YY-XX-XX-XX     dynamic
  192.168.178.255       ff-ff-ff-ff-ff-ff     static
  224.0.0.2             01-00-5e-00-00-02     static
  224.0.0.22            01-00-5e-00-00-16     static
  224.0.0.251           01-00-5e-00-00-fb     static
  224.0.0.252           01-00-5e-00-00-fc     static
  239.192.152.143       01-00-5e-40-98-8f     static
  239.255.255.250       01-00-5e-7f-ff-fa     static
  255.255.255.255       ff-ff-ff-ff-ff-ff     static

Interface: 192.168.137.1 --- 0x11
  Internet Address      Physical Address      Type
  192.168.137.53        YY-YY-YY-XX-XX-XX     dynamic
  192.168.137.194       4c-60-de-XX-XX-XX     dynamic
  192.168.137.255       ff-ff-ff-ff-ff-ff     static
  224.0.0.2             01-00-5e-00-00-02     static
  224.0.0.22            01-00-5e-00-00-16     static
  224.0.0.251           01-00-5e-00-00-fb     static
  224.0.0.252           01-00-5e-00-00-fc     static
  239.192.152.143       01-00-5e-40-98-8f     static
  239.255.255.250       01-00-5e-7f-ff-fa     static
  255.255.255.255       ff-ff-ff-ff-ff-ff     static

Interface: 192.168.255.1 --- 0x1f
  Internet Address      Physical Address      Type
  192.168.255.255       ff-ff-ff-ff-ff-ff     static
  224.0.0.2             01-00-5e-00-00-02     static
  224.0.0.22            01-00-5e-00-00-16     static
  224.0.0.251           01-00-5e-00-00-fb     static
  224.0.0.252           01-00-5e-00-00-fc     static
  239.192.152.143       01-00-5e-40-98-8f     static
  239.255.255.250       01-00-5e-7f-ff-fa     static
  255.255.255.255       ff-ff-ff-ff-ff-ff     static

Interface: 192.168.80.1 --- 0x20
  Internet Address      Physical Address      Type
  192.168.80.255        ff-ff-ff-ff-ff-ff     static
  224.0.0.2             01-00-5e-00-00-02     static
  224.0.0.22            01-00-5e-00-00-16     static
  224.0.0.251           01-00-5e-00-00-fb     static
  224.0.0.252           01-00-5e-00-00-fc     static
  239.192.152.143       01-00-5e-40-98-8f     static
  239.255.255.250       01-00-5e-7f-ff-fa     static

c:\>
Lucky for us, there is a way to filter the output a little. For Linux users this is standard fare, but Windows users can also avail of a nice utility called “findstr”. It works a little like grep. From the VRM “Connected Peers” pane you can see that the MAC address of the EV3 starts with “4c:60:de”. Unfortunately, arp on windows uses a “-“ to separate the byte fields instead of “:”. You’ll have to substitute one for the other when you type it into the cmd box:
c:\>arp -a | findstr 4c-60-de
  192.168.137.194       4c-60-de-XX-XX-XX     dynamic

c:\>
There you have it! The IP address assigned to the EV3 is 192.168.137.194. Now you can point your PuTTY client to it and either telnet (yuck) or SSH to it.
There is currently no way to assign a static IP address using reserved leases when you’re using Hosted Networks, so you’ll have to use this method to get the IP address. It shouldn’t change while the EV3 remains connected, though.
 Bot Bench I'd Rather Be Building Robots


