 Stacks are used a LOT in computing. The CPU in your laptop or PC, your mobile phone and iPad all have one thing in common, they all use stacks, without exception. So what is a stack you ask yourself? Well, think of what a stack of things is in real life: a pile of items that you can only add things to, and remove things from the top.
Stack operations
You can do two things with a stack, you can either put something on top of it, or you can take something off. The act of putting something on top is called a “push” and the act of taking something off is called a “pop”. Here is a simple drawing of the stack operations:
Putting it into code
The stack elements can be easily put into a simple struct:
// Individual stack element struct
struct tStackElement
{
  int value;                            // value held by element
} tStackElement;
All the stack needs to do is hold the elements in an array and keep track of the current size:
// Stack struct to hold the elements
struct tStack
{
  tStackElement elements[MAX_STACK_SIZE]; // array of elements
  int size;                               // current size of the   stack
} tStack;
The push() function initialises an element in the array that is next to the current top and increments the size of the stack. If the stack is full, the function returns an error. Note that the first argument of the function is a pointer to a tStack structure. Remember in the previous tutorial how we used pointers to allow us to modify a variable through another? This is the same thing, when we call the function push(), we pass a pointer to the stack we wish to push a new value onto. This way we can modify any stack we wish to pass to it. After the new value is pushed onto the stack, the stack size is incremented.
bool push(tStack *stack, int value)
{
  if (isFull(stack))
  {
    writeDebugStreamLine("Stack already at max size");
    return false;
  }

  // Add the value to the stack and increment size
  stack->elements[stack->size++].value = value;
  return true;
}
The pop() function is like the push() function in that we also pass a pointer to the tStack structure we wish to modify. The last value pushed onto the stack is returned and the stack size is decremented.
int pop(tStack *stack)
{
  if (isEmpty(stack))
    return 0;

  // Decrement size and pop and value from the stack
  return stack->elements[--stack->size].value;
}
You can download the code with a simple demo program here: [LINK]. In the example, you’ll notice there’s also an operation called peek(), which allows you to inspect the top of the stack without actually popping the value. This is generally frowned upon by purists.
Tower of Hanoi
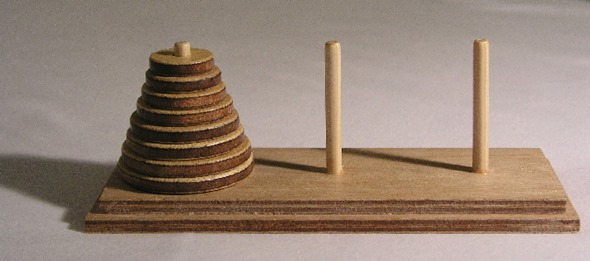
A cool way to use stacks is to play the Tower of Hanoi. Consider the following:

You have three pegs and a bunch of increasingly smaller discs on the left peg. Your job is to move these discs from the left peg to the right peg. Sounds easy, right? There’s a catch, though. A larger disc may never be on top of a smaller disc. Still sounds easy?
Lucky for us, there’s a nice to way to solve this problem. It’s described in great detail here: [LINK], so I am not going to spend a lot of time rehashing all that. The problem solving function was taken from here: [LINK] and modified to make it work with ROBOTC. What it boils down to is that we’re going to use three stacks, one for each peg and we’ll use the pop() and push() functions to simulate taking rings off and putting them on another peg. This particular method uses recursion, another ROBOTC feature that was added in version 3.5, along with pointers.
void hanoi( int N, tStack *source, tStack *dest, tStack *aux )
{
  // This is the disc we're moving from one peg to another
  int disc = 0;

  if (N > 0 )
  {
    //move n-1 disc from source to auxxilary (sub problem)
    hanoi(N - 1, source, aux, dest);

    // Take the disc off the source peg
    disc = pop(source);

    // Put the disc on the destination peg
    push(dest, disc);

    //move n-1 discs from auxillary to destination (sub problem)
    hanoi(N - 1, aux, dest, source);
  }
}
The complete program is a bit fancier and includes some animation! You can watch the video below and download the source code here: [LINK].
 Bot Bench I'd Rather Be Building Robots


Excellent !
[…] Please note that this is the second instalment of a multi-part tutorial on how you can use pointers in ROBOTC. I will also be covering things like queues, binary trees and other fun stuff. You can read about pointers in this tutorial: [LINK]. If you want to know more about stacks, you should check out part 2: [LINK] […]
[…] have not (yet) learned C or C++ and pointer usage. He has also written a follow-up post on using stacks in ROBOTC. It shows a great application for pointer usage in […]
Hey.
Just trying to get my head round this… and struggling. Why are the individual values stored in a struct and then that struct contained in the stack struct? Couldn’t the individual elements be directly stored in the stack struct?
I am sure they could, the reason I am doing it like that is that a stack element will often contain more than simply a value; it could be a stack of commands for a virtual machine. So this is not about efficiency, but about showing a concept.