Titus Woo posted on the ROBOTC forums about a really cool new program he’d written to make it easier for FTC teams to make a teleop program for their robot. I’ve never done FTC but I maintain the ROBOTC forums so I see a lot of question go by during the season about the teleop (Remote Control) part of the competition. It seems to be quite a tricky thing get right but I think Teleop Catalyst really helps take some of the hard work out of getting it right.
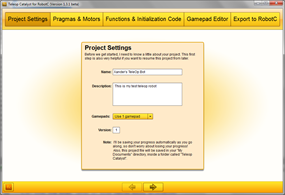
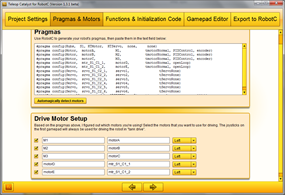
This morning I play around with it a bit and it worked very nicely. I’ve taken some screenshots of how I created my first program. It takes just 5 easy steps.
 |
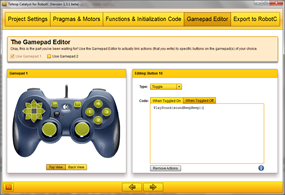 |
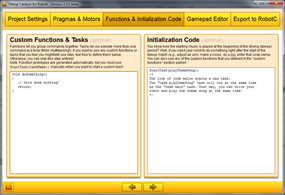
| This part is very cool, you can add your own functions and initialization code. | Awesome, you can click on a button and assign code to it when it is pressed or held continuously. |
 |
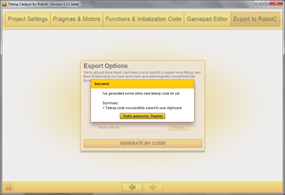 |
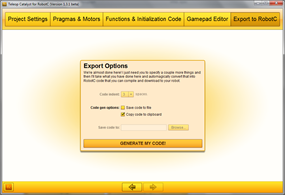
| The final step allows you to save to a file or copy it all to the clipboard, or both. | I picked the copy to clipboard. The code looks really tidy. |
The generated code looks like this:
#pragma config(Hubs,  S1, HTMotor,  HTServo,  none,     none)
#pragma config(Motor,  motorA,          M1,            tmotorNormal, PIDControl, encoder)
#pragma config(Motor,  motorB,          M2,            tmotorNormal, PIDControl, encoder)
#pragma config(Motor,  motorC,          M3,            tmotorNormal, PIDControl, encoder)
#pragma config(Motor,  mtr_S1_C1_1,     motorD,        tmotorNormal, openLoop)
#pragma config(Motor,  mtr_S1_C1_2,     motorE,        tmotorNormal, openLoop)
#pragma config(Servo,  srvo_S1_C2_1,    servo1,               tServoNone)
#pragma config(Servo,  srvo_S1_C2_2,    servo2,               tServoNone)
#pragma config(Servo,  srvo_S1_C2_3,    servo3,               tServoNone)
#pragma config(Servo,  srvo_S1_C2_4,    servo4,               tServoNone)
#pragma config(Servo,  srvo_S1_C2_5,    servo5,               tServoNone)
#pragma config(Servo,  srvo_S1_C2_6,    servo6,               tServoNone)
//*!!Code automatically generated by 'ROBOTC' configuration wizard               !!*//

/**
 * Project Name: Xander's TeleOp Bot
 * Description:  This is my test teleop robot
 * Version: 1
 *
 * This teleop file was generated using Teleop Catalyst for RobotC Version 1.3.1 beta on 1/16/2012.
 * Learn more about Teleop Catalyst at: http://ftc.kcastromechs.org/catalyst
 *
 * Feel free to modify this code as much as you'd like, as long as you keep this comment
 * block, in its unaltered form, somewhere in your code. Thanks!
**/

//// Include Files:
#include "JoystickDriver.c";

//// Function Prototypes:
// Initialize function (auto-executed when teleop period begins):
void initialize();

// "Event Handlers" for gamepad 1:
void g1_btn10_t_handler();

// Execute function(s) for gamepad 1:
void g1_btn10_t_execute();

float deadband(float power);

// Your custom functions:
void doSomething();

//// Global Booleans:
// Booleans for Gamepad 1:
bool g1_btn10_toggledOn = false;
bool g1_btn10_flag = false;

/// Joystick values:
float g1_joy1_y1;
float g1_joy1_y2;

/// Variables for driveSwap, slowDown, and deadban features:
float deadbandValue  = 10;   // Deadband is a "neutral zone" where nothing happens.
float slowDownFactor = 1;    // May be used to reduce the speed of the robot/increase sensitivity.
float joySwap = 1;           // May be used to swap the driving direction of the robot. 1 means forward = forward, -1 means forward = backwards

task main()
{
   initialize();   // Run the initialization code.

   while (true)
   {
      getJoystickSettings(joystick);

      if (joystick.UserMode == true)
      {
         g1_btn10_t_handler();

         // Update variables with joystick values:
         g1_joy1_y1 = joystick.joy1_y1;
         g1_joy1_y2 = joystick.joy1_y2;

         // Update the power of the drive motors with that of the joystick values:
         motor[M1] = (deadband(g1_joy1_y1/slowDownFactor)*joySwap);
         motor[M2] = (deadband(g1_joy1_y1/slowDownFactor)*joySwap);
         motor[M3] = (deadband(g1_joy1_y1/slowDownFactor)*joySwap);
         motor[motorD] = (deadband(g1_joy1_y1/slowDownFactor)*joySwap);
         motor[motorE] = (deadband(g1_joy1_y1/slowDownFactor)*joySwap);
      }
   }
}

void initialize()
{
   /*
      Everything in here is executed at the beginning of the teleop period.
      When the music plays, this stuff happens!
   */

   StartTask(playThemeSong);
/*
The line of code below starts a new task.
The "task playTemeSong" task will run at the same time
as the "task main" task. That way, you can drive your
robot and play the theme song at the same time!
*/
}

float deadband(float power) {
   if (abs(power) < deadbandValue) {
      return 0;
   } else {
      return power;
   }
}

void doSomething()
{
   // this does nothing!
   return;
}

void g1_btn10_t_handler()
{
   if (joy1Btn(10)) {
      g1_btn10_flag = true;
   } else if (g1_btn10_flag) {
      g1_btn10_flag = false;
      if (g1_btn10_toggledOn) {
         g1_btn10_toggledOn = false;
      } else {
         g1_btn10_toggledOn = true;
      }
      g1_btn10_t_execute();
   }
}

void g1_btn10_t_execute()
{
   if (g1_btn10_toggledOn)
   {
      PlaySound(soundBeepBeep);
   }
   else
   {

   }
}

// That's it! Enjoy, and good luck! :)
Looks pretty good, eh? Anyway, you can download Teleop Catalyst right here: [LINK].
 Bot Bench I'd Rather Be Building Robots


You should see the LabVIEW for Lego Mindstorms Remote Control Panel! Unfortunately there is nothing to find about it right now on the Internet, so you will have to wait for my new book or buy the Software right now 😉