 Bot Bench I'd Rather Be Building Robots
As some of you know, the EV3 runs a stripped down version of the Angstrom Linux distribution. The cool thing is that the kernel has been configured to output diagnostics data to the first sensor port (S1). You can easily access this data by using a USB to serial converter. You can make one yourself or if you’re not that good with soldering or hacking cables, you can wait another week or so and buy a pre-made console adapter from Mindsensors.
There is a mistake in this tutorial! You should use the red wire instead of the black wire as ground. If you don’t do this, then the cable may not work very well (or at all).
What you’ll need
- An NXT or EV3 cable you don’t mind seeing get hurt
- A cable cutter
- A soldering iron
- Soldering tin
- A wire stripper or small knife
- A USB to UART bridge dongle. I am using the Prop Plug, since I had a couple of them already. Sparkfun sells them as well, as well as many other manufacturers. Make sure you’re using a 3V version, not 5.
- 4 pin-long single row header
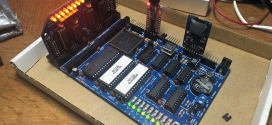
Step 1: Preparing the cable
 |
 |
 |
| Cut the cable. I prefer to take a long cable and cutting it in half, so I have another decent cable that I can use for something else (or another console converter cable) | Strip about 1.5-2cm of the outer casing off. This part is a total pain, be patient and be careful not to damage the small wires in the process. I used a very sharp knife for this. It’s good to have a band-aid handy. | Snip off the green, red and white wires, so they’re not in the way and strip about 3-4mm off the blue, yellow and |
Step 2: Soldering it together:
 |
 |
 |
| Before soldering the wires to the headers, it helps to tin them up a bit. This also stops them from fraying in the process of trying to get them soldered onto the header. If you’re not sure how to do that, you can watch a video here: [LINK]. | Carefully solder the wires onto the 4 pin header. It helps if you have one of those 3rd hands to hold it in place. I used a female header socket to hold the pins in place. This prevents them from moving around when they get hot. | Remove the female header. I also pulled out the unused pin since I am not using the reset functionality of my USB to UART converter. |
Note!
It is important that the yellow wire is hooked up to RX and that the blue wire is hooked up to TX. If you don’t you’ll either get complete gibberish on the terminal window, or worse, break something. The
blackred wire is connected to the ground (VSS) pin. Please note that this is the pinout for the Prop Plug, if you’re using another make/model, please ensure you’re connecting the right wires to the right pin:
- Yellow: RX (receive)
- Blue: TX (transmit)
Black: VSS (ground)This should be the red wire instead.
Step3: Testing your setup
Now that you’ve made a dongle, it’s time to test it out. Connect the USB dongle to your laptop or computer and make a note of the COM port. In my case it was COM4. Connect the NXT cable side to the 1st sensor port on the EV3.

Lucky for me, nothing blew up when I hooked up my converter cable to the computer and EV3.


I used PuTTY to connect to the EV3. You’ll have to configure it for 115200 baud, 8N1. It is important to note that once the VM starts, you won’t be able to interact with the EV3 anymore. That’s because the EV3 VM now expects there to be a sensor attached to that port.
Within a few days I hope to have an SD card bootable image online for you to play with so you can play around on the EV3 without the need for the LEGO VM. Until then, happy soldering.


While this information is very useful, it lacks an important detail. From the article it is not clear, whether the EV3 uses 3.3V or 5V level signals. The Prop Plug is nice enough to support both. Bur for people who have already have TTL cables in their drawer, should they use the 3.3V or the 5V ones? As most micro controllers use 3.3V, that would be my guess. But who knows?
If I had a scope, I could tell you, but I don’t and LEGO has not published this info. Go for safe and use 3V. I have amended the article, thanks!
Xander, Good details and this works with the brick out of the box, If someone with some Angstrom know-how digs into the git hub repo they might be able to configure the OS to enable a TCP/IP based ssh terminal connection via the USB port. I know that is what the beagelbone black does. Its also is based on Angstrom Linux ( by default)
Its very convenient and might be able to run while the VM does.
We’ll be working on a better, easier to use Linux distro for the EV3 that will include a couple of different VMs for people to play with. It may take some time but it will have all the trimmings and features you can imagine.
Paul, it sounds like the beaglebone mimics a USB network. Can you confirm that?
I’ve used it that way with my Talos controller (which has a BBB in it)
[…] his website, Mindstorms guru Xander Soldaat shows how to hack a Mindstorms wire by stripping of the insulation on the 6-wire cable, clipping off 3 of the wires, leaving only TX, […]
[…] his website, Mindstorms guru Xander Soldaat shows how to hack a Mindstorms wire by stripping of the insulation on the 6-wire cable, clipping off 3 of the wires, leaving only TX, […]
[…] it can be found here: [LINK]. I hooked up a serial console cable doodad, like the on here: [LINK]. When you power on the brick, you’ll be presented with a bunch of kernel output, followed by […]
[…] SD card between the Brick and my computer that was the only way I knew of that would work without creating a special cable or getting a wifi dongle. (Which I have ordered but it has not yet appeared. Cursed you Webhallen! […]
I have something like this:
3.3V
TXD
RXD
GND
5V
on my converter. Do I connect the red wire on GND or on the 3.3V “port” ?
As I understand VSS is negative – like GND and VDD is Positive. So I assume I should connect the red wire to GND?
[…] bin ich bei diesem englischsprachigen Blog fündig geworden. Leider bekommt man nur über den ersten Sensor-Anschluss […]